Music Mat
In my classroom, we use this comfy, felted mat to define the child's space while she is listening to music. I made my version out of thrift store finds. Purchase a few, old 100% wool sweaters and felt them. My experience has been hit or miss with these sweaters, even if the material states that it's 100% wool. Just to be safe, buy several and hope that at least one gives you the thick, matted results you are looking for.
Cut them into pieces and place each sweater in a separate pillowcase, tying the top closed. Put the pillowcases in the washing machine with a bit of detergent for a full hot/cold/rinse cycle. Check the results. Perhaps you would like to repeat the wash cycle, or you might try to throw them in the dryer for a bit of extra shrinkage. The fiber should be noticeably thicker and significant shrinkage should have occurred.
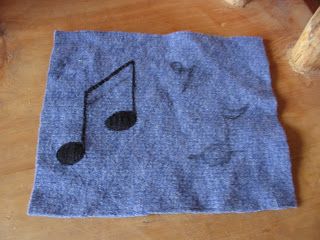
Once the felt is dry, cut 2 pieces to 12"x16". Then, use a pencil or fine-tipped marker to draw the design on one of the fabric pieces. I did mine freehand using some piano music as a guide. Once your design is outlined, you can begin with the embroidery. I used a generic embroidery floss with all 6 threads. You could also use yarn. Check out this website for how-to videos. I also HIGHLY recommend the book Colorful Stitchery by Kristin Nicholas. A few short months ago I had never considered doing embroidery, and her book has changed it all. She has some great project ideas and clear instructions for each kind of stitch. For my music mat, I used chain stitch, satin stitch, crewel outline, and blanket stitch.
Finally, you can use blanket stitch to join together the four sides of the two pieces of felt, using large safety pins to secure the fabric while you are stitching. Because of the thickness of the felt, no stuffing is needed. (Note the thickness in the photo ... and the cat, which means that the music mat has passed the comfy test!) All that's left to do is give grace and courtesy lesson on where to sit when listening to music!


No comments:
Post a Comment